
اتصال رویداد (Event Binding) در انگولار ۷
در این بخش با مبحث اتصال رویداد (Event Binding) و چگونگی کار کرد آن در انگولار ۷ آشنا خواهیم. زمانی که کاربر در حال استفاده از یک برنامه است، حرکت دادن ماوس، کلیک کردن، فشار دادن صفحه کلید و غیره همگی باعث رخ دادن رویدادهای مختلف می شوند. اکثر اوقات لازم است تا این رویداد ها را برای انجام برخی از کار ها هندل کنیم. این همان جایی است که ما می توانیم از Event Binding استفاده کنیم.
برای درک بهتر و راحت تر موضوع اتصال رویداد در انگولار ۷ مثال زیر را در نظر بگیرد.
فایل app.component.html:
<!--The content below is only a placeholder and can be replaced.-->
<div style = "text-align:center">
   <h1>Welcome to {{title}}.</h1>
</div>
<div> Months :
   <select>
      <option *ngFor = "let i of months">{{i}}</option>
   </select>
</div>
<br/>
<div>
   <span *ngIf = "isavailable; then condition1 else condition2">
      Condition is valid.
   </span>
   <ng-template #condition1>Condition is valid</ng-template>
   <ng-template #condition2>Condition is invalid</ng-template>
</div>
<button (click) = "myClickFunction($event)">
   Click Me
</button>
در کد فوق ما یک دکمه تعریف کردیم و سپس یک تابع برای هندل کردن رویداد کلیک به آن اضافه کردیم. در زیر بخش مربوط به افزودن تابع برای رویداد کلیک را مشاهده می کنید:
(click) = "myClickFunction($event)"
تابعی که در کد فوق از آن استفاده کردیم، در فایل زیر تعریف شده است:
import { Component } from '@angular/core';
@Component({
   selector: 'app-root',
   templateUrl: './app.component.html',
   styleUrls: ['./app.component.css']
})
export class AppComponent {
   title = 'Angular 7';
   // declared array of months.
   months = ["January", "February", "March", "April", "May","June", "July",
      "August", "September", "October", "November", "December"];
   isavailable = true; //variable is set to true
   myClickFunction(event) {
      //just added console.log which will display the event details in browser on click of the button.
      alert("Button is clicked");
      console.log(event);
   }
}
زمانی که کاربر بر روی دکمه کلیک کند، کنترل اجرای برنامه تابع myClickFunction را فراخوانی می کند. این تابع یک پنجره alert با محتوای “Button is clicked” را به کاربر نمایش داده و سپس event را در کنسول می نویسد.

استایل اضافه شده برای دکمه در فایل app.comonent.css:
button {
   background-color: #2B3BCF;
   border: none;
   color: white;
   padding: 10px 10px;
   text-align: center;
   text-decoration: none;
   display: inline-block;
   font-size: 20px;
}
حال مانند نمونه زیر یک رویداد change به لیست کشویی موجود در برنامه اضافه کنید تا زمانی که گزینه انتخاب شده در آن لیست تغییر کرد، فراخوانی شود.
محتوای فایل app.component.html:
<!--The content below is only a placeholder and can be replaced.-->
<div style = "text-align:center">
   <h1>Welcome to {{title}}.</h1>
</div>
<div> Months :
   <select (change) = "changemonths($event)">
      <option *ngFor = "let i of months">{{i}}</option>
   </select>
</div>
<br/>
<div>
   <span *ngIf = "isavailable; then condition1 else condition2">
      Condition is valid.
   </span>
   <ng-template #condition1>Condition is valid</ng-template>
   <ng-template #condition2>Condition is invalid</ng-template>
</div>
<br/>
<button (click) = "myClickFunction($event)">
   Click Me
</button>
تابع استفاده شده برای رویداد change در فایل app.component.ts تعریف شده است:
import { Component } from '@angular/core';
@Component({
   selector: 'app-root',
   templateUrl: './app.component.html',
   styleUrls: ['./app.component.css']
})
export class AppComponent {
   title = 'Angular 7';
   // declared array of months.
   months = ["January", "Feburary", "March", "April", "May", "June", "July",
      "August", "September", "October", "November", "December"];
   isavailable = true; //variable is set to true
   myClickFunction(event) {
      //just added console.log which will display the event
      details in browser on click of the button.
      alert("Button is clicked");
      console.log(event);
   }
   changemonths(event) {
      console.log("Changed month from the Dropdown");
      console.log(event);
   }
}
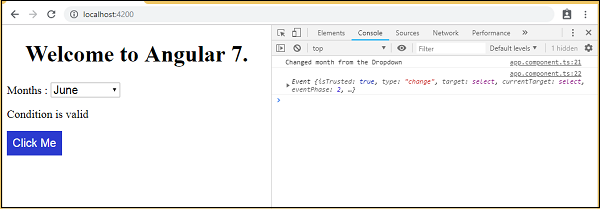
حال اگر برنامه اجرا کنید، هنگام انتخاب یک گزینه از لیست پیام Changed month from the Dropdown در کنسول چاپ خواهد شد.
خروجی برنامه:

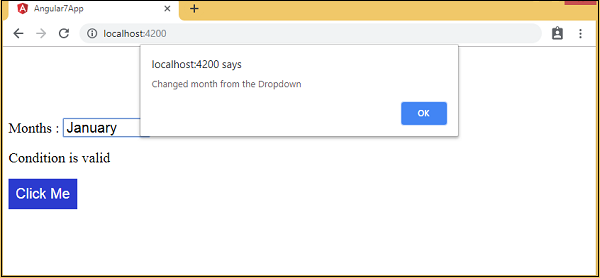
شما می توانید با تغییر محتویات تابع changemonths به شکل زیر هنگام تغییر گزینه انتخاب شده، یک alert به کاربر نمایش دهید:
changemonths(event) {
      alert("Changed month from the Dropdown");
   }
خروجی برنامه بعد از تغییر:

نوشته اتصال رویداد (Event Binding) در انگولار ۷ – آموزش انگولار ۷ اولین بار در سورس سرا - آموزش برنامه نویسی. پدیدار شد.


